Back to Maintenance Manager Main Menu
Viewing Work Orders from a Schedule
- To view work orders that have generated from a Schedule, click on the Admin tab and select PM Schedules.
- Click on the PM Title associated with your schedules.
- Scroll down to the Scheduling section and click on the schedule whose work orders you want to view.
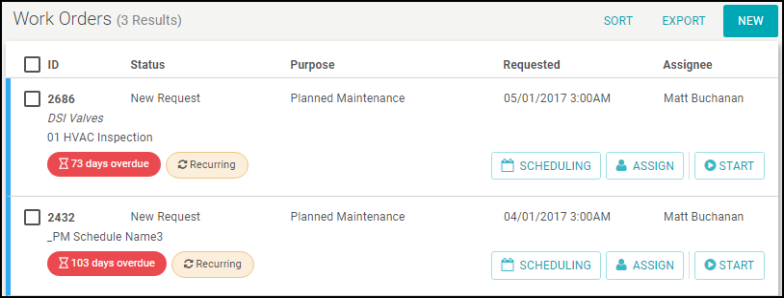
- Click the View Work Orders link.
![]()
- You will then be taken to a list of those work orders. *Note: Work orders created from a schedule will show as Recurring when looking at the work order list.
Editing Task Books on a Schedule
Task Books on a schedule can be edited by copying or linking a new task book.
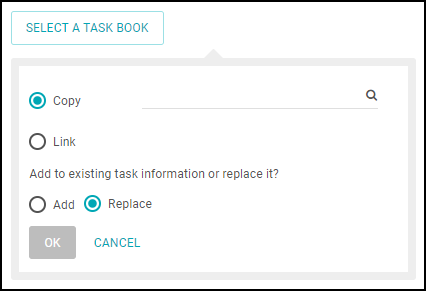
- To edit a Task Book on an existing schedule, click on the Select a Task Book button.
- Click on the magnifying glass to choose a task book you would like to copy or link. When copying a task book there are two options:
- Add - will add the selected task list to the current task list.
- Replace - will replace the existing task list with the newly selected one.
- When you Link a Task Book you are choosing to overwrite any existing information already in the task list.
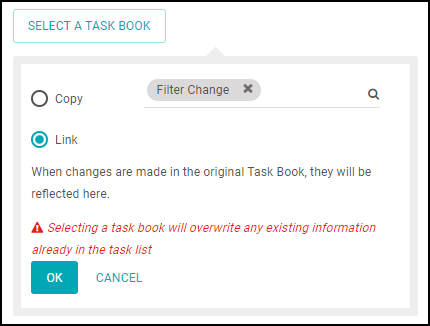
- Click the OK button once you have selected a new Task Book.
- Click Save at the bottom of the screen once you have made your necessary changes.
Deleting and Deactivating Schedules
A PM Schedule can be deleted at any time as long as no work orders have generated from it. If work orders have generated from the schedule, you will need to deactivate it.
Deleting a Schedule
- Click on the Admin tab and select PM Schedules.
- Click on the PM Title associated with the schedule(s) you want to delete.
- Scroll down to the Scheduling section and click on the schedule.
- Click the red DELETE link. A pop up window will appear confirming that you want to delete the schedule. Click YES.
- Click the Save button at the bottom of the screen.

Deactivating a Schedule
*Note: Inactive schedules will still show in your list of schedules but will be noted with an orange "Inactive" icon.
- Click on the Admin tab and select PM Schedules.
- Click on the PM Title associated with the schedule(s) you want to deactivate.
- Scroll down to the Scheduling section and click on the schedule.
- Uncheck the box next to Active.
- Click the Done link.
- Click the Save button at the bottom of the screen. *Note: If you want to reactivate a schedule, simply click the schedule, check the box next to Active, click Done, and click Save at the bottom of the screen.

